Well, not actually first triangle since the ‘flash the screen’-renderer implemented to test the game loop view controller also rendered a white rectangle, but let’s not split hairs ;-)
Over the last week I added rendering code for a very crude representation of
the game world, using lines to draw the planet surface, and squares to render
entities. I spent most of the time reading up on vertex arrays and
vertex/fragment shaders, it had been a while since I last used OpenGL ES 2 for
anything, and the (desktop) OpenGL code I worked on for a day-job project was
actually only making things more confusing since there isn’t a fixed-function
API in OpenGL ES 2, and you cannot do direct mode rendering. This means that
to get anything useful to the screen in OpenGL ES 2 you have to setup your
projection and model-view matrices yourself, you have to use pixel and vertex
shaders, and you cannot use glBegin/glEnd to send individual vertices using
glVertex3f and such, only vertex arrays or vertex buffer objects are supported.
Fortunately there’s lots of OpenGL ES 2 sample code and examples to be found on
the internet, and in addition to that I had a hard-copy of the official OpenGL
ES 2 Programming Guide lying around, so with a few hours
of self-study I got confident enough to hack up some rendering code. So how do
we start? Well, getting a reference to the K14Planet instance from the view
controller, obviously, iterating its surface edges to setup a vertex array and
drawing them as a line loop, then iterating over all entities and drawing
something for each of them. Sounds easy enough right? Not so fast! What if at
some point in the future, for reasons beyond the scope of this post (I’ll get
back to this subject later), we want to run the render loop on a separate
thread? If the thread the game and physics update runs would modify some part
of the game state that is also being accessed by the render thread, mayhem
would ensue.
Detour: read-only, double-buffered game state
The solution to this (possible, future) problem is relatively straightforward: just don’t access the game state (planet, entities) directly from the renderer. Instead, after each game update, create a read-only carbon-copy of just the subset of game state that is required for rendering, and make sure the renderer gets exclusive access to this snapshot when it starts rendering a frame, for example using a single-slot queue. Any time the renderer grabs the snapshot it retains a reference to it that persists for as long as the renderer takes to render the frame. In the mean time, the game update thread may update game state, create a new snapshot, and replace the one in the single-slot queue. This means that at any point in time there could be two ‘live’ snapshots: one that is being rendered, and one that’s ready to be rendered. This is why this technique is sometimes called ‘double buffered game state’.
I implemented basically exactly what’s described in the previous paragraph,
using 2 new classes K14PlanetSnapshot and K14EntitySnapshot. Any time the
K14Planet step selector is called to update the physics simulation and call
K14Entity step for all active entities, a snapshot of a subset of the planet
and entities is made, and assigned to an atomic property snapshot, which is
what the K14GLES2Renderer reads every time it renders a frame.
Rendering
The rendering code itself is extremely simple and inefficient right now, it
basically re-initializes a vertex arrays for planet surface edge segments
and for each entity, every time a frame is rendered. There is no batching,
and I don’t use vertex buffer objects (VBO’s) to upload static data to the
GPU once and re-use it for subsequent frames. I use an orthogonal projection
matrix setup using GLKMatrix4MakeOrtho, using a view volume that roughly
matches the area of the planet you would expect to see
in a single screen, in planet coordinates. If you take a look at the
planet 0 sketch in the skeletons
post, you can see that a viewport running from about -10 to 10 in x, and -1
to 16 in y, will roughly fit the initial screen. To eliminate aspect ratio
distortion caused by the difference in the x and y resolution of the screen,
the viewport is scaled by the screen aspect ratio:
float aspect = (float) view.drawableHeight / (float) view.drawableWidth;

GLKMatrix4 ortho = GLKMatrix4MakeOrtho(-10.0f, 10.0f, -1.0f * aspect, 16.0f * aspect, 0.01f, 2.0f);

glUniformMatrix4fv([_debugPolyShader getUniform:@"u_projection"], 1, GL_FALSE, ortho.m);
The vertex shader used for rendering simply multiplies each vertex coordinate by the projection matrix, and by the model-view matrix, which right now is simply the identity matrix for the planet surface, and a translation matrix for each entity, created using the entity position. The vertex shader just assigns a constant color configured using a uniform variable to each pixel. This is what it looks like:
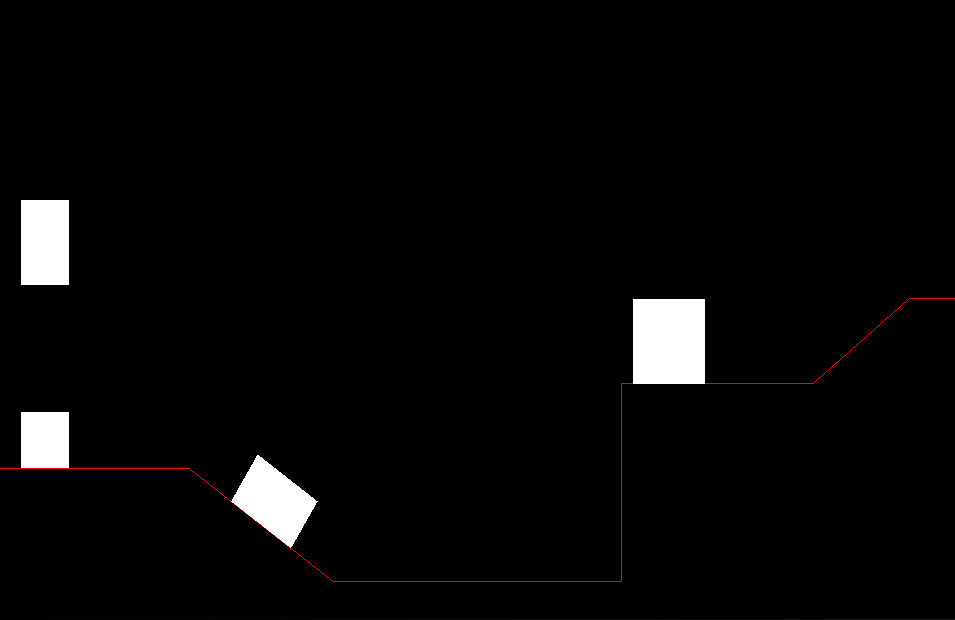
The rectangle at the top-left is the player ship, and in the simulator you will actually see it falling down until it lands on the block below (a fuel pod). It’s not interesting enough to make a screen recording, so you’ll just have to trust me it works ;-)
Over the next week I will be working on rudimentary interfaces for input handling, to be able to simulate user inputs (thrust, rotate) and have the ship react to them.
Development scoreboard
Implementing the planet and entity snapshot classes took about an hour. Implementing the planet surface and entity rendering took about 3 hours, most of which was spent trying to figure out why I didn’t see anything on the screen as soon as I enabled the projection matrix in the vertex shader. The problem turned out to be that I assigned positive values for all z-coordinates, which means everything was positioned behind the camera because by default, the positive z-axis points from the screen to the user. After I finally figured this out, setting up the vertex arrays and initializing the shader uniforms (projection matrix, color to draw) only took me about half an hour…
The total development time (excluding research) is now about 12 hours. The SLOC count for the complete project (excluding Box2D) is 352.